How to Draw a Duck Step by Step (Mallard)
This guide shows how to draw a duck in a simple cartoon like style. It consist of twelve illustrated steps with quick instructions.

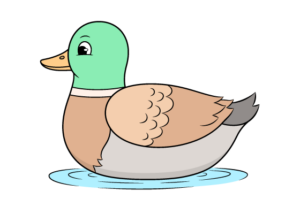
The example drawing is of a mallard male duck. Male ducks of this kind have a distinct and beautiful feather patterns which can make them quite interesting to draw.
As mentioned, the tutorial is broken up into twelve steps. These show how to draw the different parts of the duck’s body as well as how to draw some water around it. The final step shows how to color the drawing.
It’s recommended that you start in pencil and make light and easy to erase lines (in case you need to correct a mistake). Darken them after you have all parts of the duck and the water outlined.
Step – 1 Draw the Duck’s Head

First, draw an outline of the duck’s head and neck. Make the head close in shape to a circle but leave the bottom of the outline open and have it curve backwards on one side (as it transitions into the back of the neck).
Step – 2 Draw the Body

Running down from the head draw the body. First, add the little bit of the neck at the front curving outwards away from the head. This should then transition into the large curve of the body that runs all the way to the tail. Make this curve slightly flattened around the bottom. Making the bottom flatter will help make it look like the duck is sitting on water (added later on). Finally, draw the outline curving slightly downwards near the tail. Leave the top of the outline open for the wing.
Step – 3 Draw the Outline of the Bill

Onto the front of the duck’s head add the bill. At this stage of the drawing you only need it’s outline. Save the details for a later step.
Step – 4 Draw the Wing

Draw the wing with starting with the curve of it’s forward facing end. This should then run down towards the back of the body. Draw the top of the wing curving slightly downwards near the end and then back up again. Draw some splits at the end of the wing to show feathers.
Step – 5 Draw the Tail

At the back of the body draw the tail with and a split on it’s end (to again, show some feathers).
Step 6 – Draw the Mouth & Nostril

Show the duck’s mouth as a curved line that runs across the lower part of the bill. Next, add an oval shaped nostril near it’s upper back area.
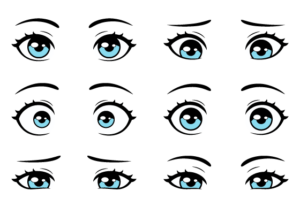
Step 7 – Draw the Eye

As this the example is of a cartoon style duck, it’s eye is drawn different from that of a real one.
Outline the eye’s shape to look similar to an upside down letter “U”. And define it’s bottom with a light curve. Inside the main outline add the iris overlapped by a little oval reflection. Position the iris in the eye’s lower forward facing area. To finish, add a little curve above the eye to create a hint of an eyebrow.
Step 8 – Draw the Neck Ring

Male mallard ducks have a feather pattern that creates a white ring around their neck. Outline this with a pair of curved lines as shown in the example.
Step 9 – Draw the Chest Feathers

Outline a patter of darker feathers around the duck’s chest. Draw some splits into the outline at the very bottom to create a hint of feathers.
Step 10 – Draw the Wing Feathers

Show some more of the wing’s feathers around it’s middle. Draw these as a series of curves similar to fish scales or scallops.
For drawing an actual fish see:
How to Draw a Goldfish (Easy Step by Step Guide)
Step 11 – Draw the Water

Once you have all parts of the duck outlined, add some water ripples around it to show that it’s sitting on water. Draw these as curves that form an oval like shape around the bottom of it’s body.
Once you’ve added the water you can trace over your drawing with a thin black marker or darker your lines with the pencil.
Step 12 – Color the Duck

To finish the drawing you can color the duck. Paints or colored pencils/pencil crayons both be good options for doing so as they will allow you to easily create the different variations of brown and grey.
Apply the colors as follows:
- Head – green
- Neck ring – white (or very light brown)
- Chest – brown
- Wing – light brown and regular brown (same as for the wing)
- Body – grey
- Tail – dark grey
- Water – light blue
After coloring the you can add a shadow along the bottom of it’s body. An easy way to do this is to simply darken the area using a regular pencil. You can also slightly darken the nostril in the same way.
The shadows will help make the drawing look a little less flat.
Conclusion
This guide shows how to draw a male mallard duck in a simple cartoon style. As mentioned at the start of the tutorial, male ducks of this kind have a distinct feather pattern which can make them interesting to draw. Doing so in a stylized manner can be much easier than if you were to draw a more realistic looking duck. However, the end result can still look quire nice.
Hopefully you’ve found this guide helpful and the step easy to follow.
For more similar tutorials also see:

")
")
")